Mike Bacidore is the editor in chief for Control Design magazine. He is an award-winning columnist, earning a Gold Regional Award and a Silver National Award from the American Society of Business Publication Editors. Email him at [email protected].
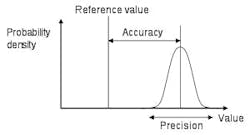
Figure 1: Accuracy is the closeness of the measured quantity to the true answer, and precision is the closeness of repeated measurements to each other.
Source: Schneider Electric
Many sensing applications require both accuracy and precision. The trick is to know when one or the other takes precedence.
“Accuracy is the closeness of the measured quantity to the true answer,” explains Wade Mattar, flow product manager, Schneider Electric. “And precision is the closeness of repeated measurements to each other (Figure 1). Custody transfer, filling operation and batch operations are a few examples that require a combination of both accuracy and precision, or reliability.” But many applications are out there.
For example, although a robot may have a very good repeatability at +/-0.020 mm, it has difficulty replacing a CNC machine due to the robot’s poor accuracy in this space, says David Perkon, vice president of advanced technology, AeroSpec. “A multi-axis CNC machine starting at a datum, or zero point, and moving 600 mm in any direction will move that exact distance within a tight tolerance,” he says. “A robot or multi-axis gantry on the other hand, moving 600 mm in any direction will have much higher variation in the final position due to poorer accuracy, but it will precisely move to the same inaccurate position.”
Combining accuracy and precision around a taught robot position or within a limited range of motion is common and is a good practice if accuracy is suspect, Perkon explains. “Where poor accuracy starts to show is in large spaces where the desired positions are calculated from a single starting position,” he says. “The error adds up. However, teaching multiple points and taking advantage of the robot’s or motions system’s repeatability often helps.”
Applications that require both accuracy and precision include part dimension and tolerance measures, part positioning and other metrology tasks, explains Ben Dawson, director of strategic development, Teledyne Dalsa. “Machine vision tasks that use edge-based measurements lend themselves to this combination because we can measure edge position to a fraction of a pixel and have calibration methods that reliably translate pixels into standard measures,” he says. “On the other hand, some types of applications, such as verifying that a part is present or detecting surface defects, generally do not need high accuracy and precision; you just want to know if the part is there or undamaged.”
If an application needed to move a robot arm to the same place repeatedly for an assembly process, for instance, high precision may be desirable, says Matt Hankinson, senior technical marketing manager, MTS Sensors. “Typically, the linear placement is adjusted after the mechanical setup of the system to correct any offsets, so accuracy, or true distance traveled, isn’t required,” he explains. “If an application is not going through an initial adjustment and it’s critical to travel a known distance without any offset, then high accuracy may also be required from the sensor. There is also an ISO 5725 standard with all the details.”
Imagine using a linear scale inscribed on a metal bar to measure a length, offers Peter Thorne, director of the research analyst and consulting group at Cambashi. “Perhaps repeated readings give results all within 0.1%; this is a measure of the precision,” he explains. “If the scale had suffered an impact that compressed the metal bar, every reading might be 1% different from the true value. When using sophisticated measurement devices, there can be many possible sources of these systematic errors.”
Also Read: How to Hone Your Sensing Applications
The development of a production process can define calibration procedures to achieve required accuracy, as well as tooling or sensor specifications, setup and testing to achieve required precision, explains Thorne.
“Statistical methods then provide an effective way of handling the variations found during production,” he says. “It may be possible to identify trends in readings and predict when they will fall outside of specification, enabling some preventive action before this happens. The pattern of readings may be enough to identify likely causes. For example, electrical current consumption on start-up can identify wear and tear of motor bearings. There is a trade-off between extensive measurement—for best prediction and determination of problems—and the time and cost of measurements—fewer sensors and readings generally make a process step faster and lower cost. Good specifications help handle these trade-offs.”
Almost all applications need to deliver both precision and accuracy to defined requirements, says Thorne. “Precision, even without accuracy, demonstrates control of a process; it delivers consistent results,” he explains. “The hunt for and elimination of systematic errors will guide the process to deliver the required, accurate results.”
Both accuracy and precision come at a price, warns Colin Macqueen, director of technology, Trelleborg Sealing Solutions. “It’s important to understand just how accurate and how precise a system needs to be,” he explains. “Let’s say, for example, that you’re designing an hydraulic cylinder that will position a component during a manufacturing process and will need to hold that component in a specific position. You would then need to look at your system and ask how important it is that the cylinder stops at a specific location—accuracy—and how important it is that the cylinder stops in the same location every time—precision.”
A prime example of an application requiring both accuracy and precision, or repeatability, would be a custody-transfer application, where value of a commodity such as petroleum fuels is being measured, or in a safety system such as cooling water for a nuclear reactor, offers John Accardo, senior applications engineer, Siemens.
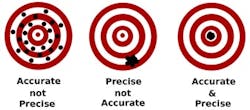
Figure 2: Think of the relationship between accuracy and precision as a graph or as the way marks group on a bull’s-eye.
Source: Emerson Process Management
“In a flow-related scenario, this would mean that the meter to be proven accurate would need some form of proving system or traceability to a calibration laboratory that was close to the real value that it is trying to measure,” says Jason Laidlaw, oil and gas consultant, Flow Group, Emerson Process Management.
“If this was mass, then the ultimate standard is 1 kg in Paris and accuracy referenced to this is achieved by a sequence of unbroken measurements to get to the metering point, which in the United States would pass through NIST. You then need a meter that has good repeatability so you can determine how close you are to the reference, so one with precision of +/- 10 kg is not going to give very good results in determining how close you are to 1 kg. If this was time, then measuring to 1 s can be done on pretty much any watch; how accurate it was would depend on how close you could compare to an atomic reference clock. If you then wanted to measure 1 ns, a normal watch won’t do this, so you need a timer counter that gives more precision, and generally costs more than an average watch. However, the accuracy is still then related to how close this value can compare to an atomic reference clock.” Laidlaw offers two visual aids as explanation (Figure 2).
“Accuracy is of paramount importance when there is a requirement to measure something to an actual standard, for example, a cut-to-length application,” explains Henry Menke, marketing manager, position sensing, Balluff. “The measurement error will be directly reflected in cut-length errors. Another application is precision CNC movement during part manufacturing. Again, any measurement deviation will appear as additional dimensional tolerances in the final part, beyond that caused by other sources. Typically, applications demanding accuracy also demand precision, because precision is a necessary but not sufficient condition to achieving accuracy.”
Precision is important in motion-control applications, continues Menke. “A measurement system lacking in one or both elements of precision—resolution and repeatability—will not perform well,” he says. “Lack of sufficient resolution, for example, works against velocity control because velocity is the mathematical derivative of position. Poor position resolution results in even poorer velocity resolution, leading to unstable velocity control as the system tries to react to limited real-time data regarding instantaneous position. In extreme cases, this can result in bang-bang operation of the prime mover as it tries to go full-on first one way and then the other. This leads the system tuner to dial back the gain, slowing down response time.”
A motion control system with sufficient resolution but lacking in repeatability may operate smoothly and with good response time, but it will produce inconsistent results because the controller "trusts" that the position feedback is the same time and again, explains Menke. “As far as the controller is concerned, it has closed the loop and made the measured variable match the command value,” he says. “However, if the measurement is not very repeatable, the motion control system has no way to compensate. Measurement sensors with high precision and accuracy tend to be those that employ a calibrated scale as part of the operating principle. The two primary technologies are optical scales and magnetic scales. The scales are manufactured to exacting tolerances by transferring the position encoding from a master reference onto it. The scale in combination with a reader head is called a linear encoder.”
Optical and magnetic encoders, for example, are targeted toward different classes of accuracy and precision. “The optical encoders typically offer the absolute highest levels of accuracy and precision, but come at higher cost,” explains Menke. “They also come with some application considerations related to tolerance for shock, vibration and contamination by dirt particles and fluids. Magnetic encoders find application in areas where the ultimate level of accuracy and precision is not required, but high accuracy and precision are still required. Magnetic encoders are typically less expensive than optical, especially at longer measured lengths. Magnetic encoders are also more tolerant of adverse application conditions such as shock, vibration and contamination.”
Accuracy is used in roll diameter, thickness measurement and loop control applications, offers Darryl Harrell, senior application engineer, Banner Engineering. “Repeatability is used in positioning applications and to determine if a part has fallen out of its specified tolerance.”
Kevin Kaufenberg, product manager at Heidenhain says coordinate measuring machines, laser trackers and length gauges are some measurement applications that must encompass accuracy, while pick-and-place machines and robot arms are applications requiring precision.
“Accuracy is degree of conformance to a specification or set of specifications,” says Phillip Warwick, product specialist, Eagle Signal & Veeder Root. For example, a product document may state ‘accurate to within +/-10% of set point.’ Precision is a scale or degree of accuracy, such as in the case of a position indicator; a reading or set point of 2.531 is more precise than a reading of 2.53.
“Many applications for timers require a combination of precision and accuracy,” explains Warwick. “Digital timers offer best set-ability and also may be set to provide timing precision of 1 ms. A typical application where timing accuracy and precision are important would be in a chemical injection pump, where a pump or solenoid is energized for a specific amount of time, for the purpose of ensuring proper ratios of compounds or mixtures. A high degree of accuracy is attainable due to the precision of the set points.”
