Put the Screws to Tough Vision Apps
By Joe Feeley, Editor in Chief
The quality requirements for a precision parts supplier to the automotive and aerospace industries are a source of both stress and high opportunity for the parts maker.
Established in 1967, Prime Engineered Components has two modern facilities in Connecticut that manufacture precision turned products for industries ranging from aerospace to automotive. In its Watertown facility, Prime manufactures about 800,000 parts per week, mostly for automotive industry customers. Each part has to be flawless, or Prime runs the risk of costly and time-consuming returns, as well as strained relations with its customers.
Using a new, compact, flexible and economical optical inspection tool, Prime met its goal of 100% quality while making inspections easier for programmers and users alike to implement.
Searching for a Solution
"Our customers don't require it, but we know that our machines aren't 100% capable," says Kathy Dibble, director of quality for Prime. "Since our parts are produced too quickly for manual inspections, we had to put vision in place for a multitude of dimensional inspections. We would much rather remedy any quality problems in-house before product ships to our customers."
The parts are manufactured on vintage multi-spindle screw machines. Material is fed into the machine in bar stock form and machined accordingly. "We are not doing any in-process inspection," Dibble explains. "The inspections are done offline by my quality department on a separate machine."
Cloudy Vision
Prime was using another vision system in its Watertown plant to inspect components, the majority of which are knurled. These grooved and patterned parts present significant lighting and measurement challenges—challenges that Prime's previous vision system wasn't able to surmount.
"The reason for replacement was due to changes in critical, high-tolerance dimension requirements from Prime Screw customers," explains Adam Farley, product specialist for integrator and solutions provider Action Automation & Controls. Farley teamed up with Engineered Solutions—one of Prime's machine builders and an Action Automation customer—to specify and develop the new vision system. "Before using any inspection equipment, all QC inspections were done by the quality department using hand inspection tools," he adds.
[pullquote]Farley says Engineered Solutions uses products and services from Action to support its machine building operation, and the two companies have been partners in many different machine builds that required machine-vision inspection.
The existing system has problematic issues with accuracy, reliability and repeatability. "Kathy's quality department was constantly manually inspecting sample lots based on these issues," Farley says.
In this case, speed was not an issue to start, but Farley and Dibble expected the system to have higher image-processing capabilities, able to process any inspection speed that might be expected.
The Solution Measures Up
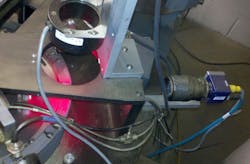
Farley's team selected BOA, an integrated optical inspection tool from Teledyne Dalsa (Figure 1). "It has all the elements of an industrial machine vision system—including sensor, light control processing engine, I/O, factory communications, developer and operator interfaces, and a protective IP67 enclosure—in a small, smart camera-style package," Dibble explains. "The system requires a simple setup using a laptop PC and Teledyne Dalsa's iNspect Express Software." The inspection program can be set up accordingly and saved to the camera. The laptop can then be removed if required when running the machine.
Figure 1: The integrated optical inspection tool chosen has all the elements of an industrial machine vision system—including sensor, light control processing engine, I/O, factory communications, developer and operator interfaces, and an IP67 enclosure.
Source: Dalsa
When designing the solution, Farley incorporated new inspection criteria for gauging the outside dimensions of the knurled parts, he says. Inspections of these parts are performed using the caliper tool in the iNspect application software. Embedded in the BOA, iNspect features an easy-to-use graphical interface and a toolset for a wide range of applications.
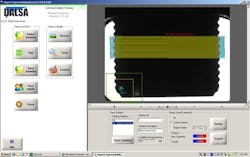
"This inspection couldn't have been done without the caliper tool," Farley says. He first tried using a rake tool, but it was only able to provide an average of the high and low dimensions. "We needed to catch any of the really high points of the critical dimensions for greater precision," he says. "The iNspect caliper tool does this (Figure 2)."
Figure 2: The vision system required a simple setup using a laptop PC and iNspect Express software. Prime says this inspection couldn’t have been done without the software’s caliper tool to catch any really high points of the critical dimensions for greater precision.
Source: Dalsa
The rake tool in BOA computes the average distance across a part from the intersection points between "raked" lines and the part edges, explains Steve Geraghty, director of Teledyne Dalsa's Industrial Products Group. "The caliper tool uses a similar approach, but instead computes the maximum distance between the two outermost points along the edges."
In addition to its precision, the iNspect caliper tool is very user-friendly, says Dibble, who does the verification runs and sets up the programs for the camera. "Ease of use and programming, along with its accuracy, were the primary reasons I decided to take a chance on a new camera," she states.
Training was not difficult, Farley says. "Kathy did have existing training with other PC-based systems and was able to pick up the Dalsa iNspect Express software in no time."
Basic, but Critical Quality
This current application is pretty straightforward. A proximity sensor triggers the unit when a part comes into the field of view. The camera takes an image of the part and the caliper tool measures the outside dimensions of the knurled part to determine whether it passes or fails.
"For the critical knurl dimensions, the part's orientation to the camera was key," Farley says. "Field of view and lighting became a factor as well. Speed was not the major concern for Kathy, but accuracy, repeatability and reliability of each inspection was what would give her peace of mind."
Parts that pass continue down the production line, while failed parts are dropped off in the back of the rotary table after the inspection is performed, defects are verified, and the part is taken out of production. "It's a simple, streamlined machine vision application that has worked wonders for our quality control," Dibble says.
Reaping Prime Benefits
Both Farley and Dibble agree that the quality of the parts going out the door has increased dramatically since the BOA solution was implemented during the spring of 2010. "Prime has seen a significant increase in accuracy, reliability and repeatability," Farley reports. "Machine downtime stemming from frequent issues with the old vision system has been greatly reduced, and we can expect zero defects to our customers," Dibble adds.
In addition, Dibble and her team are very pleased with the ease of use of the BOA, in particular with the embedded iNspect Express interface. "iNspect Express allows users to build solutions using a comprehensive toolset that is accessed via a web browser from a standard PC or laptop, and it connects directly to a variety of Ethernet-ready factory devices," she says. "We haven't had a single glitch with the system in the six months that it's been up and running."
Prime says it's installing two more Teledyne Dalsa cameras for inspections on high-volume automotive inspection machines at its Watertown plant for 2011 operation. "The technology has proven itself, and we feel confident that Prime and our customers will continue to benefit as a result," Dibble concludes.
Farley says that extensive data acquisition and networking are planned for the future. "Data acquisition would result in the ability to count parts accurately, better tracking those parts, and monitor machine ware, he says. "It also will let Prime create reports for customers based on the particulars of the inspection criteria, and internally the data can supply design engineers and the quality team with failed-part images."


