Some of us have fond memories of Grandpa, hunched over his workbench with a bright lamp overhead. The smell of burnt electronics and solder fills the air as he fixes an old radio. Back then the electronic parts were large, clunky items that would tell you when something was wrong. They communicated in excessive heat, the occasional spark or sometimes the release of the magic smoke inside that made them work.
Fast forward to today, and take a look at a modern circuit board. It is hard to tell a working board from one that has failed. Microchips and surface-mount components have an extra layer of mystery hidden in their tiny little forms. Electronic components and devices fail. This is an electrical-engineering fact of life. With the tendency of devices to be made much smaller and at much less cost, it has become increasingly difficult to troubleshoot when failures occur. Grandpa’s magic touch doesn’t apply any more.
Now, it is usually more economically feasible to replace rather than repair. There are good repair services available, but often the cost of the repair is too close to the cost of a new component to justify sending it in. When this is the case, it often makes more sense to buy the newest version, which may also have improvements over the older version.
However, if the repair is quick and easy enough to complete it is often worth the time. Here are some simple repairs that can be done quickly and may end up saving you, your company or your client some money.
Electrolytic capacitors—caps—are often the cause of failure of a board. They are generally there to filter noise or ripple out of dc voltages.
When they fail, it is normally due to loss of electrolyte through leakage or vaporization. This decreases the capacitance and can cause voltage issues on the board, leading to failure.
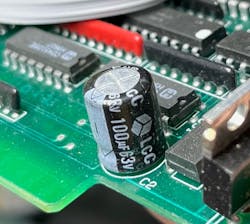
The signs that the capacitor is the problem are discoloration on the board below the cap where it has leaked or a bulging top of the cap where it has gotten too hot and vaporized the electrolyte (Figure 1). Often merely replacing these caps with new ones of the same value will bring a board back to life.
Solder micro cracks are another common source of failure, especially if the printed circuit board (PCB) is subjected to higher temperatures. In this cycle of the PCB heating and then cooling, the board can flex. The solder joints do not flex in the same manner and can develop very fine cracks that can lead to discontinuity.
Solder that is brittle can develop similar cracks due to vibration. These can act like an open circuit or cause intermittent connection, either of which can cause a board to fail.
A common way to fix this is to reflow the solder. This can be done by removing the board from its housing and removing any attached plastic parts and then baking it in an oven for a short period of time.
Oven temperatures may vary, but good results can be achieved around 275° for eight minutes. Care should be exercised because temperature variations can also lead to a bare board and a pan full of components. Some experimentation is advised before ruining an expensive board.
Another technique that has brought good results is to brush some rosin paste flux over the solder joints of the board and then very carefully heat them with a very fine torch. The flux liquefies immediately so a very light touch is all that is needed. Be sure to clean the excess flux off with flux remover afterward.
Other than these methods, inspect the board for obvious failures. Microchips, transistors and diodes sometimes will crack when they fail. Other components will have discolored areas on the board around them that indicate overheating and possibly failure.
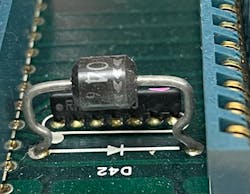
A large resistor or diode that is mounted so that the body of it is positioned well above the board is a sign that it is a sacrificial component that will give its life to save the rest of the board. Replacing this component, making sure to mount it in the same fashion, will sometimes bring the board back to working order (Figure 2).
These are the easiest of repairs. They do not consume much time in analyzing or repairing the problem. If the process takes more than 30 minutes, it may not be worth the effort. Of course, this depends on the situation. Is it a critical device? Is there a long lead time to replace it? Are there viable alternatives? These and other questions may justify a more thorough investigation and repair.
If you can manage to fix the problem in 30 minutes and get the machine or process started again, then you are the hero of the day. Grandpa would be proud.


