By Joe Feeley, Editor in Chief
We've been fortunate to develop several in-depth machine vision case histories that focus on machine builders, system integrators and discrete manufacturers. We'll print these stories later in 2011. In the meantime, we extracted some of what they said for a quick look at the state of machine vision today, as well as to whet your appetite for things to come.
The inclusion of machine vision in precision parts manufacturing and/or assembly operations moved from an expensive luxury to an essential step a while ago. Demands for faster line speeds, better yields, and tolerances measured in microns affect manual as well as fully automated systems today.
Precise Requirements
The quality requirements for a precision parts supplier are illustrative of both stress and high opportunity for a parts maker.
Prime Engineered Components (www.primeeci.com) manufactures precision turned products for industries ranging from aerospace to automotive. In its Watertown, Conn., facility, Prime makes about 800,000 parts per week. Each part has to be flawless or Prime runs the risk of costly returns, as well as strained relations with its customers.
"We know that our machines aren't 100% perfect," says Kathy Dibble, director of quality for Prime. "Since our parts are produced too quickly for manual inspections, we had to put vision in place for a multitude of dimensional inspections. We would much rather remedy any quality problems in-house before product ships to our customers."
ThyssenKrupp System Engineering (www.thyssenkrupp-systemengineering.com) in Auburn Hills, Mich., is a global designer and manufacturer of turn-key assembly and test systems for automotive powertrain components including engines, transmissions and axles. A manufacturer of construction and heavy equipment recently commissioned ThyssenKrupp to build an engine assembly line for a new plant. In addition to its role as a line builder, ThyssenKrupp had to provide a machine vision solution for the engine assembly line.
The company was a new customer for ThyssenKrupp and was skeptical about using vision-based inspection as part of its assembly line. It questioned the reliability of the results as well as the dependability and maintainability of vision. "But, working with the customer, we determined that the part complexity, combined with the extensive teardown and rework required if an error is made, justified the use of in-station inspection," explains ThyssenKrupp program manager Pat Coughlin. "A camera was a perfect fit because it could handle the part variation and be located completely out of the operator's workspace."
The complexity of machine-vision inspection applications can vary greatly depending on the speed of the operation and the detection tolerances required to ensure quality.
A machine-vision application to gauge 20 cylindrical parts per second that are 2 or 3 in. long and 9 mm in diameter to micron tolerances at line speeds of 52 in. per second falls in the complex category, even for an experienced machine-vision integrator such as MoviMed (www.movimed.com), based in Irvine, Calif.
The metal cylinders in question are made out of a brass alloy. The parts are made from small metal "cups" that are drawn into a hollow cylinder. The resulting part has small features, such as a little lip, a slant angle and an undercut. "All of these features are critical for proper functioning of the system since a precise mechanical fit is of the utmost importance," says David Ritter, scientific technologist—real time systems at MoviMed.
Why Change Now?
"The replacement of the older vision system was due to changes in critical, high-tolerance dimension requirements from Prime Screw customers," explains Adam Farley, product specialist for integrator and solutions provider Action Automation & Controls (www.actionauto.com), which partnered with Prime Engineered on the new vision system. "Before using any inspection equipment, all QC inspections were done by the quality department using hand inspection tools." The existing system had problematic issues with accuracy, reliability and repeatability.
The machine MoviMed worked on was equipped with a 1980s-era optical-gauging system. Besides obsolescence issues, the system was not measuring to desired tolerances. The company performed some calculations and optical simulations to approximate the old system's performance as a baseline from which to work. "It turned out that the old system was limited primarily by the optical path—mainly a custom lens design that could not reproduce details better than about 100 µm at a contrast level of at least 50%," explains Markus Tarin, president and CEO. "Second, the image sensor used was a line scan sensor with only 128x1 pixels. The system used an averaging technique to try to overcome some of its limitations."
Another flaw in the original design was that critical measurements were based on indirect references derived from the tooling and part fixture and not actual measurements. This invariably led to measurement drift caused by mechanical wear and tear.
Choices
The first steps of the ThyssenKrupp vision solution were developed using six Matrox Iris GT smart cameras. As an engine moves down the line, it goes through multiple smart camera-based vision inspection stations. These applications vary from absence/presence to gauging/measurement.
Three applications on this new line used machine vision for inspections. One smart camera verifies that the crank gear and water pump gear are aligned properly. Another application uses four Iris GTs. Cameras 1 and 2 both verify the presence and location of eight water seals. Camera 3 determines the presence and location of a drainback seal, another gasket and eight water seals. Camera 4 verifies that only a single head gasket is installed.
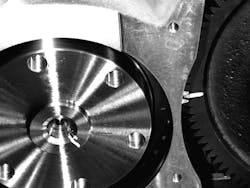
A third application (Figure 1) uses a single Iris GT to verify that the timing mark (painted line) on the idler gear is between two painted teeth on the crank gear.
Matt Maitland, ThyssenKrupp controls engineer, says the vision system applications were developed with Matrox Design Assistant, an integrated development environment that's bundled with the smart camera. For this application, smart cameras were preferrable because the company believed they provided better hardware reliability vs. a PC and frame grabber.
"Matrox Design Assistant is an integrated development environment (IDE) where machine vision applications are created by constructing a flowchart instead of coding programs or scripts using languages like Basic, C, C++ or C#. Once development is finished, the project (or flow chart) is uploaded and stored locally on the Matrox Iris GT," Maitland says. "The project then is executed on the smart camera, without the need for any companion PC and, in this case, is monitored and controlled from the PLC over an Ethernet link."
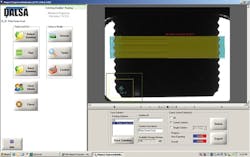
For Prime's needs, Farley's team selected BOA, an integrated optical inspection tool from Dalsa. "It has all the elements of an industrial machine vision system—including sensor, light control processing engine, I/O, factory communications, developer and operator interfaces, and a protective IP67 enclosure—in a small, smart camera-style package," Dibble explains. "The system requires a simple setup using a laptop PC and Dalsa's iNspect Express software."
When designing the solution, Farley incorporated new inspection criteria for gauging the outside dimensions of the knurled parts. Inspections of these parts are performed using the caliper tool in the iNspect application software. Embedded in the BOA, iNspect features an easy-to-use graphical interface and a toolset for a wide range of applications.
Figure 2: The vision system required a simple setup on a laptop PC and iNspect Express software. Prime Engineered Components says this inspection couldn't have been done without the software's caliper tool to catch any high points of the critical dimensions for greater precision.
Prime Engineered Components
"This inspection couldn't have been done without the caliper tool," Farley says. He first tried using a rake tool, but it was only able to provide an average of the high and low dimensions. "We needed to catch any of the really high points of the critical dimensions for greater precision," he says. "The iNspect caliper tool does this (Figure 2)."
Several factors made the MoviMed project choices especially challenging. "At 9 mm diameter and 2 to 3 in. length, the aspect ratio of the part was problematic," Ritter says. "The specs called for a measurement resolution of 1.5 µm, but even with specialized hardware, achieving the 1.5 µm target would be a formidable challenge. A 16 Mpixel camera with a telecentric lens at 1:1 magnification was specified. However, even with this configuration, our engineers concluded that sub-pixel interpolation would be necessary to increase the effective resolving power of the measurement system."
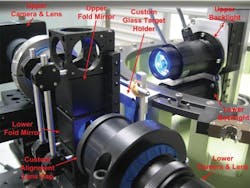
To further complicate matters, there were no standard 16 Mpixel camera lenses available that could meet all the optical specifications. "So, our next best solution was to use two cameras and a prism (Figure 3) that would let us fold one of the cameras out of the way for the 1x optics we needed," Tarin says. "As a result, we had to calibrate two camera imaging spaces and combine them as one."
Figure 3: With ideal components literally unavailable, MoviMed's solution was to use two cameras and a prism. As a result, the company had to calibrate two camera imaging spaces and combine them as one.
MoviMED
As a National Instruments Alliance Partner, MoviMed is very familiar with the company's machine-vision capabilities. The selected NI products for the system included LabView Real-Time and NI vision software, two PCIe-1427 Camera Link image acquisition boards, a PCI-6254 Multifunction M Series data acquisition (DAQ) board for encoder tracking, and a PCI-8433 serial interface board for RS-422 communication with the factory PLC. They used two Camera Link cameras for the profile measurements and two smart cameras for the cross-sectional gauging.
"This project would have been difficult to complete without LabView Real-Time, NI vision software, and NI hardware," Tarin says. "With built-in multicore support, versatile vision libraries, and PCI Express Camera Link frame grabbers available off the shelf, we were able to divert our attention away from the basic hardware and interfacing issues and toward the difficult domain challenges at hand."
Successes Abound
The MoviMed project was a huge success, according to Tarin. MoviMed met and exceeded the very stringent requirements. One gauging requirement called for a standard deviation of 12.5 µm and the system achieved a standard deviation of better than 1 µm. For the factory acceptance, the system was scrutinized by two Six-Sigma Black Belt statistical experts.
The ThyssenKrupp vision system was deployed in September 2010. "Deployment went smoothly," Maitland says. "Application troubleshooting was very limited and handled remotely in Auburn Hills by way of emailing a few images that required a second look, and it's easy to debug a flowchart when the logic is visually presented as interconnected blocks."
Further, ThyssenKrupp needed to spend only a day to train the plant staff on the vision system. And so far, there have been no technical issues that have required ThyssenKrupp to send staff on-site to troubleshoot.
Both Farley and Dibble agree that the quality of the parts going out the door has increased dramatically since the BOA solution was implemented during the spring of 2010. "Prime has seen a significant increase in accuracy, reliability and repeatability," Farley reports. Dibble adds, "Machine downtime stemming from frequent issues with the old vision system has been greatly reduced, and we can expect zero defects to our customers."
In addition, Dibble and her team are very pleased with the ease of use of the BOA, in particular with the embedded software interface. "iNspect Express allows users to build solutions using a comprehensive toolset that is accessed via a web browser from a standard PC or laptop, and it connects directly to a variety of Ethernet-ready factory devices," she says. "We haven't had a single glitch with the system in the six months that it's been up and running."

Leaders relevant to this article:

