Mike Bacidore is the editor in chief for Control Design magazine. He is an award-winning columnist, earning a Gold Regional Award and a Silver National Award from the American Society of Business Publication Editors. Email him at [email protected].
In sensing applications, performance can be improved by combining accuracy and precision, but what’s the difference between them?
Consider accuracy and precision in both two-dimensional and three-dimensional spaces, advises David Perkon, vice president of advanced technology, AeroSpec. “In its simplest form, accuracy is measured everywhere in space, and it is measured to national standards,” he says. “It is exact everywhere in the 3D space around the equipment work envelope, which is important in many applications. Precision, or repeatability, may vary depending on where the tool or part is positioned. A noted difference between accuracy and precision is that, in the 3D space, repeatability is more consistent in some positions than others.”
In machine vision, accuracy means how close a measurement is to its true value relative to a standard, explains Ben Dawson, director of strategic development, Teledyne Dalsa. “Precision is the fineness to which the measure can be made, often limited by measurement noise,” he says. “For example, when a machine vision system measures a dimension, the number of valid—noise-free—digits in the measure is the precision, and the accuracy is how close the measure is to a reference dimension in, say, millimeters.”
See Also: Zero in on the Sensor Precision, Accuracy Target
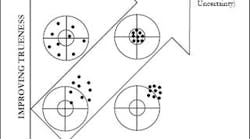
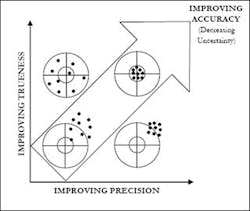
You can imagine measurement as shooting arrows at a bull’s-eye target, suggests Dawson (Figure 1). “The center of the target is the desired true value of the measurement,” he explains. “Then accuracy is how close to the center your measurement arrows are, and precision is how closely your arrows are clustered, assuming that arrows have a finite diameter.”
Figure 1: If an application isn’t going through an initial adjustment and it’s critical to travel a known distance without any offset, then high accuracy may also be required from the sensor.
Precision is a measure of the sensor’s ability to repeatedly report the same value when moving to the same position, says Matt Hankinson, senior technical marketing manager, MTS Sensors. “It’s a statistical measure of the random spread or variability of values at the same point on the sensor scale,” he explains.
“Accuracy is a measure of the closeness to the true value across the full measuring range. In many applications, it is important to have good repeatability, or precision, from a control perspective, so the movement is consistent, but it isn’t necessarily important to have absolute accuracy with the true value. The term accuracy is sometimes used to mean trueness, which is technically a different parameter. Trueness is the closeness to the true value over an average of samples and represents a systematic bias in the measurement. It is possible to have a large spread of measurements—poor precision—that average out to the true value, which would have a high degree of trueness. Accuracy is technically a combination of the multiple errors source for the overall closeness to the true value for each measurement. Resolution, not to be confused with precision, is the underlying smallest change that can be measured and doesn’t factor the repeatability of precision.”
Knowing the precision and accuracy of readings is key to effective measurement and sensing, advises Peter Thorne, director of the research analyst and consulting group at Cambashi. “Take repeated readings, and, even when the item being measured is not changing, you will get a range of values,” he warns. “The differences are caused by random reasons like electrical noise, or perhaps vibration of the equipment you are using. The precision of the measurement quantifies variations between repeated readings. Accuracy is different. It quantifies the gap between the true value and the measurement. Accuracy is often more difficult to determine than precision is, because systematic errors can impact the accuracy without changing the precision.”
If you're carrying out a set of repeated measurements, precision describes the ability of your process to get the same result each time for multiple measurements of the same item, but it doesn't take into account whether the results are close to the true value, explains Colin Macqueen, director of technology, Trelleborg Sealing Solutions. “Accuracy describes how close your results are to the true value, but it doesn't take into account the consistency of the results,” he says, “so precision tells you how far your individual results are from the mean, whereas accuracy tells you how far your mean result is from the true value.”
Precision is the degree to which the correctness of a quantity is expressed, says John Accardo, senior applications engineer, Siemens. “It is essentially how accurate your accuracy is,” he explains. “A better term, and one more commonly used, would be ‘repeatability.’ Then we could apply these answers. Accuracy is to be within a certain percentage of a defined goal, such as +/- 0.5% of actual flow. Repeatability would be within a certain percentage of a certain reading every time the same circumstances occur, such as +/- 0.5% at 100 gal/min. A measurement can be repeatable without being accurate, but it cannot be accurate without being repeatable.”
Accuracy is the closeness of agreement between a measured quantity value and a true quantity value of a measurand, explains Jason Laidlaw, oil and gas consultant, Flow Group, Emerson Process Management. Accuracy is how close a measured value is to a traceable reference source. Precision is the closeness of agreement between indications or measured quantity values obtained by replicate measurements on the same or similar objects under specified conditions—how well you can determine the scale of your measurement, how grouped they may be, which leads to how repeatable you can determine the result, he says.
“Accuracy is an indication of the degree of correctness of a measurement,” says Henry Menke, marketing manager, position sensing, Balluff. “A measurement is said to be accurate when the indicated value closely corresponds to the state of the actual variable in the real, physical world. All practical industrial measurement systems exhibit some degree of inaccuracy. The specification of accuracy is normally given using terms such as error, deviation or nonlinearity. All things being equal, smaller is better when it comes to this specification.”
Precision is an indication of the ability of a measurement system to detect small changes in the measured variable and closely repeat a measurement time and again under the same conditions, says Menke. “So, precision is actually defined by two specifications: The ability to detect small changes in the measured variable is typically called resolution,” he says. “Again, smaller is better. The second specification of precision is normally given using terms like repeatability or repeat accuracy—approaching the same measured value from the same direction—and hysteresis or bi-directional repeatability—approaching the same measured value from opposite directions. In both cases, the more precise system will yield a smaller figure.”
Every sensor has a measure of variation from the ideal output, explains Darryl Harrell, senior application engineer, Banner Engineering. “Accuracy is a measurement of a sensor’s actual output vs. the ideal output,” he says. “Precision is what we call repeatability. This is a sensor’s ability to consistently detect a target at the same range.”
The definition advanced by ISO associates trueness with systematic errors and precision with random errors, and it defines accuracy as the combination of both trueness and precision, says Kevin Kaufenberg, product manager, Heidenhain. “We would add that the measure of accuracy is truly defined in terms of measurement by national standards,” he explains. “The National Institute of Standards and Technology (NIST), which is part of the U.S. Department of Commerce, sets the benchmarks at which measurement science and standards in terms of accuracy must abide. Precision is the ability to perform accurate measurements repeatedly and reproducibly under different environments and users.”
